tp
Developer Guide for Yet Another Module Organiser / Manager
Table Of Contents
- Developer Guide for Yet Another Module Organiser / Manager
- Table Of Contents
- 1. Introduction
- 2. Setting up
- 3. Design
- 3.1 Architecture
- 3.2 Model package
- 3.3 Parser Component
- 3.4 Command Component
- 3.5 Utils Component
- 4. Documentation
- 5. Testing
- Target user profile
- Value proposition
- Appendix A: Product scope
- Appendix B: User Stories
- Appendix C: Non-Functional Requirements
- Appendix D: Glossary
- Appendix E: Acknowledgements
1. Introduction
1.1. Welcome!
Welcome, and thank you for choosing to help contribute to Yet Another Module Organiser/ Manager! Yet Another Module Organiser and Manager (YAMOM) is an all-in-one desktop app featuring a full course catalogue, module search and timetable builder for the National University of Singapore, optimized for use via a Command Line Interface.
This document intends to onboard developers onto YAMOM. We hope to bring you in to fix bugs, or even adding new features and dimensions to YAMOM! It gives insights on how the project is set up, the architecture used, and the code style one should adopt when contributing to the project.
2. Setting up
This section describes the development tools used in the creation of YAMOM.
2.1. Prerequisites
- JDK 11
- IntelliJ IDEA
- Gradle 6.2
2.2. Setting up the project locally
- Fork this repo, and clone the fork into your computer.
- Open IntelliJ (if you are not in the welcome screen, click
File>Close Projectto close the existing project dialog first). - Set up the correct JDK version for Gradle
a. To set up the correct project structureConfigure>Project Defaults>Project Structure
b. UnderNew...find the directory of the appropriate JDK version. - Click
Import Project. - Find the
build.gradlefile and select it. ClickOK. - Click
Open as Project. - Click
OKand accept the default settings.
2.3. Configure the coding style
In IntelliJ’s IDEA we adopt [se-edu/guides] IDEA: Configuring the code style to set up IDEA’s coding style to match ours.
Optionally, you can follow the guide [se-edu/guides] Using Checkstyle to find how to use the CheckStyle within IDEA e.g., to report problems as you write code.
3. Design
3.1 Architecture

How the architecture components interact with each other
Core program flow (Main) is managed by the Duke class.
Commons represents a collection of commonly used classes.
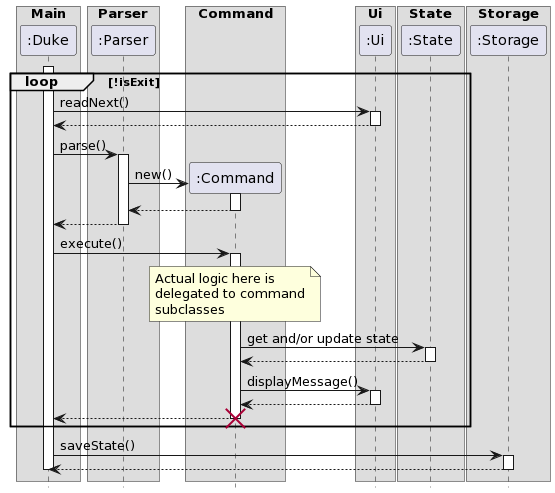
The Duke class delegates work to the Ui class to handle user input.
User input is passed to the Parser class to parse the input as a command. Each command subclass handles its own execution.
These are the three main subcomponents that duke and command subclasses delegate work to:
Ui: Handles user interactions such as receiving input and displaying output.State: Stores and updates application state.Storage: Reads and writes data to the hard disk in a NUSMods export link format.
3.2 Model package
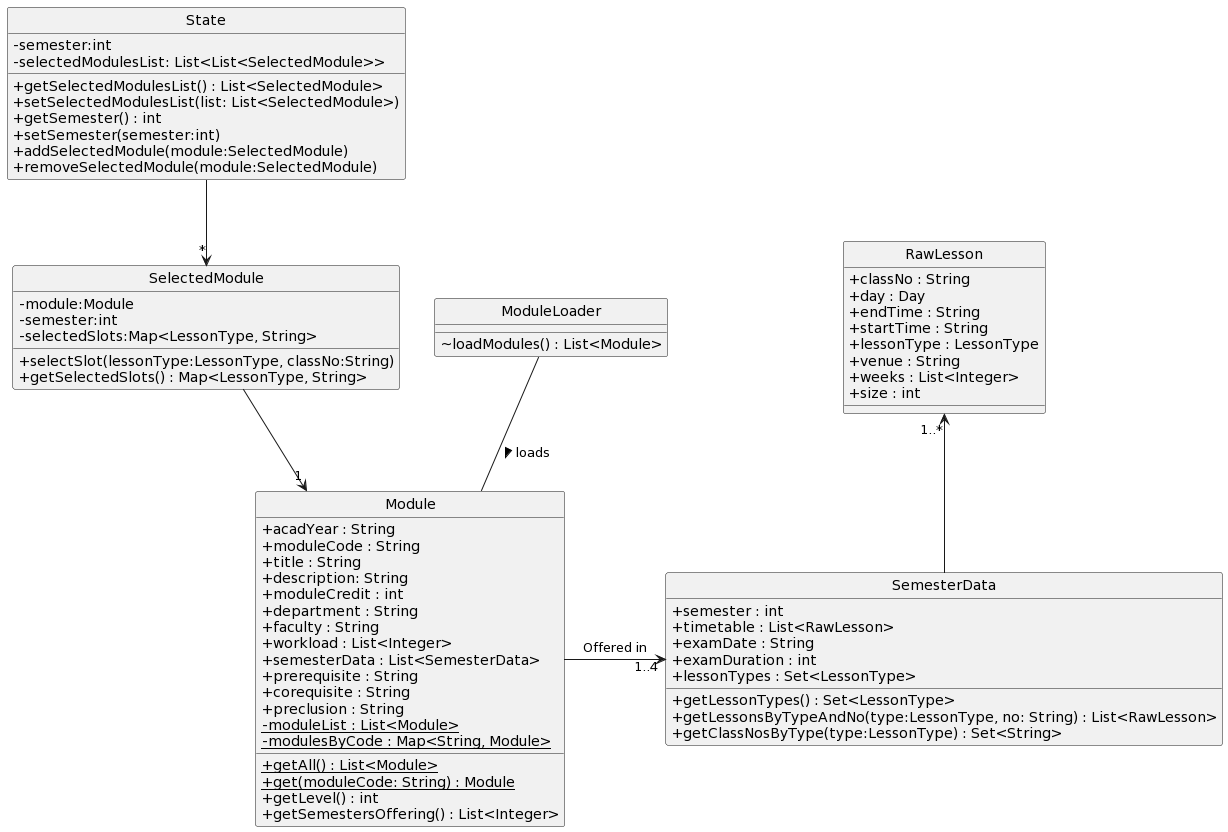
The Model package is responsible for business logic - in particular, for dealing with any module related data. The design of these classes is based off the original NUSMods type classes .
It consists of the following classes:
Day: Represents a day in the timetable.LessonType: Represents the type of lesson.Module: Represents a module in NUS.ModuleLoader: Loads the module information from the NUSMods resource file.RawLesson: Represents a single block in a timetable representing one lesson slot. Properties are meant to be freely accessed but not modified.SelectedModule: Represents a module selected by the user that is to be added into his or her timetable.SemesterData: Semester data contains all the module information pertaining to a single semester.Timetable: Creates a timetable for the user with their selected modules and in their planning semester.
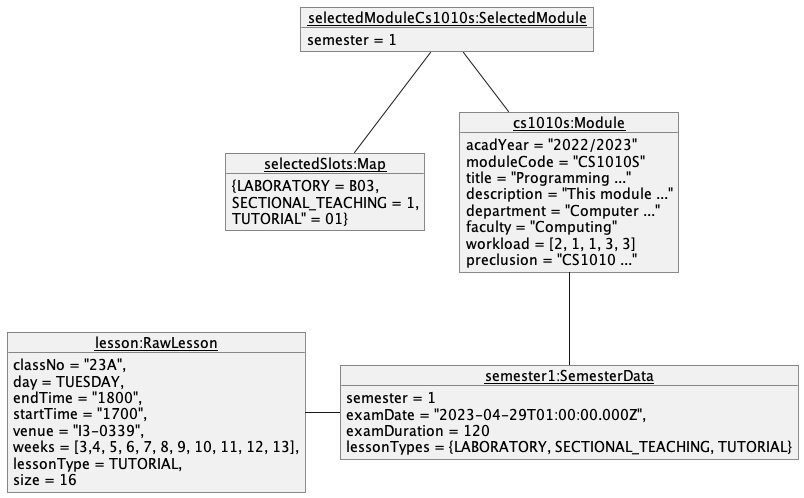
An object diagram of an instance of SelectedModule, the abstracted unit that will be mainly dealt with in the model is
shown below.
3.2.1 Module Loader
Module loading is handled by the ModuleLoader class. This class contains logic to parse the data file stored
at src/main/resources/moduleFull.zip. The data file is a ZIP file containing a JSON file. Zipping is used to minimize
the application size. In exchange, the data file needs to be unzipped to read the module data, but this only happens
once at the start of the application. JSON parsing in the ModuleLoader class is done using
the Jackson Databind library.
3.2.2 Timetable
The Timetable class handles the logic of formatting a timetable, given a set of lessons to be shown. To cater to a CLI
environment, the timetable is always shown with time running vertically. One of the challenges in timetable formatting
is that lessons may overlap, and the width of the timetable needs to be adjusted in such cases.
The sequence of steps to generate a timetable can be summarised as follows:
- Calculate the earliest and latest class. This will determine the height of the timetable.
- Check if any classes have overlapping timeslots. If so, generate a list of indentation levels for the classes.
- Create a buffer, a 2D array of Strings, to store our output.
- Write the day labels and time labels to the buffer.
- For each class, draw the bounding box into the buffer and write the class codes into the buffer.
3.3 Parser Component
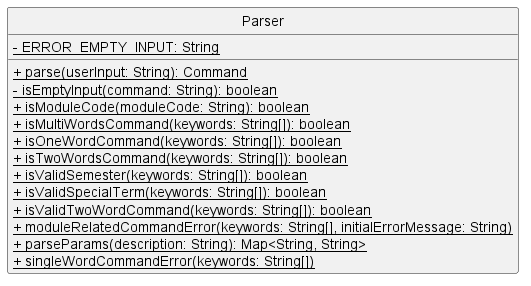
The Parser component can:
- return the correct command type based on user input.
This component also consists of DayParser and LessonTypeParser to help parse their respective
day and lesson info into programme-understood values.
3.3.1 How the feature is implemented
The main function of the Parser component is parse which returns the correct command type
based on the first word of the user input. It also consists of various helper functions for the different
Command classes to validate if the user input is correct.
3.3.2 Why it is implemented this way
The Parser component should not know what is a valid command for the specific command type but instead
can assist in parsing the user input to do data validation. It only carries out basic data validation to
check if the user input does not belong to any command type. This also makes it easier to add new commands
in the future as the developer only needs to create a new command class and the parser checks for the new keyword.
3.3.3 Alternatives considered
All invalid inputs handled by the Parser and only returns valid Command classes.
However, this will make the Parser class will be very long as it has to check for all invalid inputs for all commands.
Additionally, it will be difficult to implement as different commands have different parameters that they require.
Finally, it will also lead to tight coupling and decreased cohesion.
3.4 Command Component
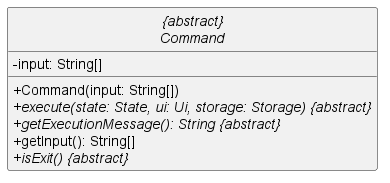
The Command component can:
- execute based on the command type.
The individual Command classes contains public static final String that specifies the keyword, usage and description
of that command.
They may also consist of various possible error messages related to that command.
Below is a table of command subclasses and their respective command type. The different command types extends from the Command class and are all in the command package. You may click the specific command under Command Subclass to view more information about that command.
| Command Word | Command Subclass | Intended Outcome |
|---|---|---|
add |
AddModuleCommand |
Adds the user input module into their timetable. |
remove |
RemoveModuleCommand |
Removes the user input module from their timetable. |
list |
ListCommand |
Display all the module and slot selected by user |
bye |
ByeCommand |
Exits the program. |
export |
ExportCommand |
Creates a portable NUSMod link to create their timetable on NUSMod |
info |
InfoCommand |
Display all details about a module. |
help |
HelpCommand |
Display all possible command words and their usage to user. |
import |
ImportCommand |
Import user’s timetable from a NUSMod share timetable link. |
search |
SearchModuleCommand |
Searches similar modules based on code, title, semester or level. |
semester |
SelectSemesterCommand |
Selects the semester that the user want. |
select |
SelectSlotCommand |
Selects the time slot for the different lesson types. |
timetable |
TimetableCommand |
Views the user timetable with user’s selected modules. |
3.4.1 AddModuleCommand
The AddModuleCommand class extends from the Command class and adds the user input module into
their timetable.
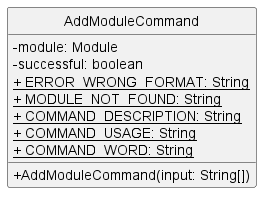
3.4.1.1 How the feature is implemented
The AddModuleCommand class extends the Command class.
The constructor AddModuleCommand() parses the user input module code .toUpperCase() as the format to fetch an
instance of module from its class. Boolean successful field is used to flag successfully added modules in comparison
to instances where it is not possible to add the module as it already exists in the state’s selectedModuleList.
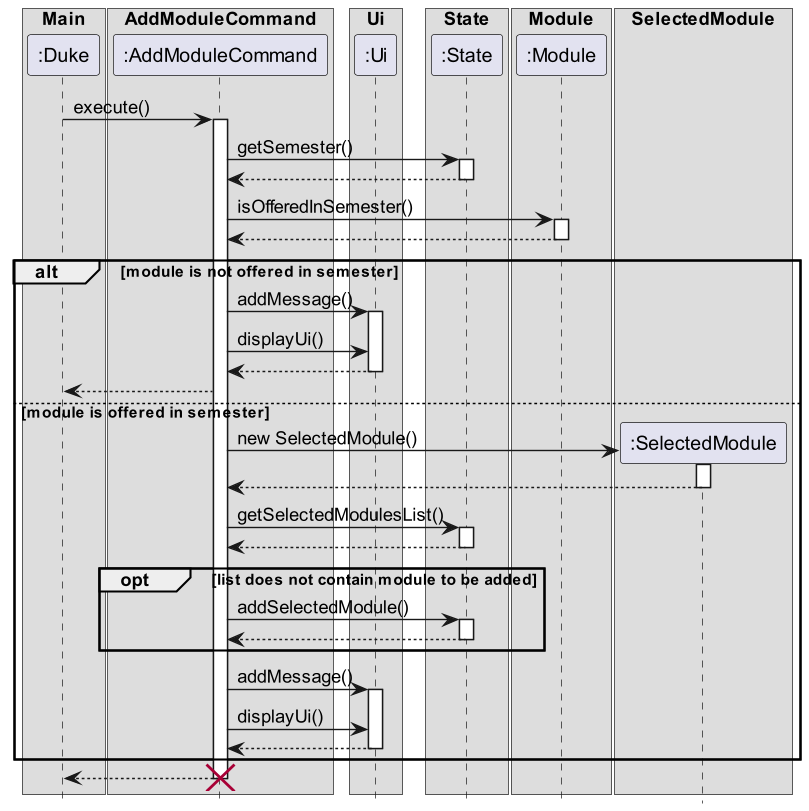
It overrides the execute() method from the Command class, and updates successful accordingly, which will later be
passed on to the overridden getExecutionMessage() which displays the result of data validation that
new selectedModule added are unique.
3.4.1.2 Why it is implemented this way
As we do not want users to add duplicate modules, we need to check if the module (to add) already exists in the selectedModuleList.
The following sequence diagram shows how the operation works:
3.4.1.3 Alternatives considered
Initially, data validation was being handled by the Parser class, however in the principles of avoiding tight coupling
and improving cohesion, it was moved back under the AddModuleCommand class.
3.4.2 RemoveModuleCommand
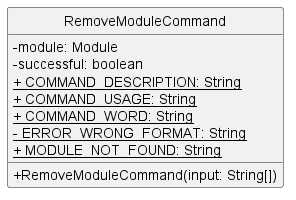
The RemoveModuleCommand class extends from the Command class and deletes the user input module
from their timetable.
3.4.2.1 How the feature is implemented
The RemoveModuleCommand class extends the Command class.
Similar to AddModuleCommand class, the constructor RemoveModuleCommand() parses the user input module
code .toUpperCase() as the format to fetch an
instance of module from its class. Boolean successful field is used to flag successfully added modules in comparison
to instances where it is not possible to add the module as it already exists in the state’s selectedModuleList.
It overrides the execute() method from the Command class, and updates successful accordingly, which will later be
passed on to the overridden getExecutionMessage() which displays the result of data validation that
the selectedModule
instance is only removed from the selectedModuleList if it exists.
3.4.2.2 Why it is implemented this way
As it does not make sense to remove a module that does not exist in the selectedModuleList, the RemoveModuleCommand
have to check if the module (to remove) exists in the selectedModuleList before removing it.

3.4.2.3 Alternatives considered
Once again, data validation was being handled by the Parser class, however in the principles of avoiding tight
coupling
and improving cohesion, it was moved back under the RemoveModuleCommand class.
3.4.3 HelpCommand
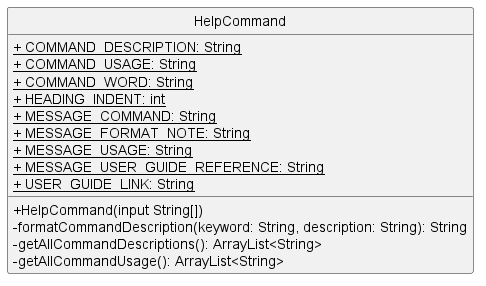
The HelpCommand class extends from the Command class and displays the help message.
3.4.3.1 How the feature is implemented
The HelpCommand class extends the Command class
The HelpCommand class compiles the description of each command keyword and their usages by invoking getDescription
and getUsage of the other command subclass.
Within HelpCommand there are other messages that help to make it more user-friendly and intuitive to read.
Among the message that HelpCommand contains, it has a link to the user guide that aim to direct user to the project
repository,
where user are able to read about the various commands in further details.
3.4.3.2 Why it is implemented this way
It is to encapsulate the process of getting useful information within one class, where the class only focuses on compiling the information and formatting it in a way that makes most intuitive sense to the user.
3.4.3.3 Alternatives considered
Each command class to print the messages sequentially, this creates unnecessary complexity when printing information as changing the number of commands available will involve refactoring at multiple parts of the codebase.
3.4.4 SearchModuleCommand
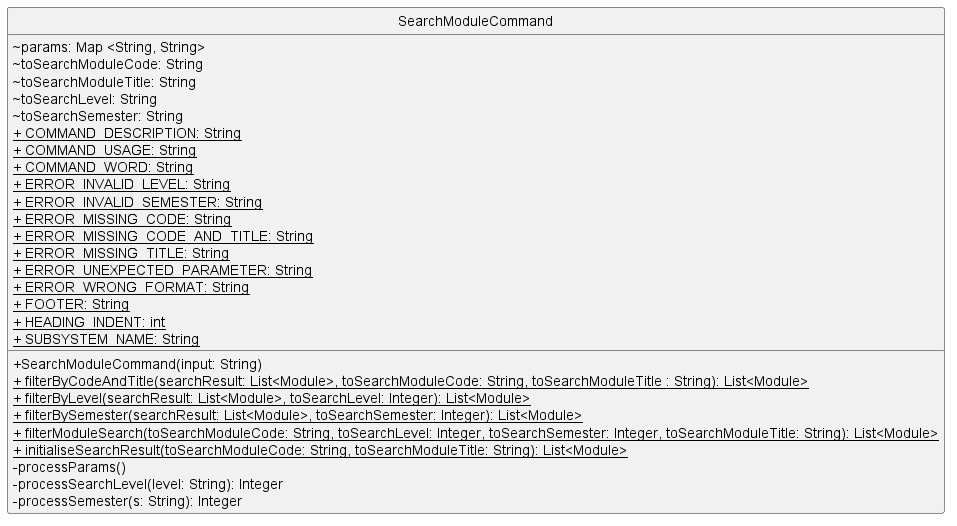
3.4.4.1 How the feature is implemented
The SearchModuleCommand class extends the Command class.
It overrides the execute() method from the Command class.
The execute() method will search for the user input module primarily based on either module code or title,
with additional parameters of semester and level to narrow down the search results.
3.4.4.2 Why it is implemented this way
User may or may not know the exact module code or title. As such, the user can search for the module based on optional parameters such as semester or level. However, the user must input at least the module code or title before additional parameters can be added in order to refine the search.
3.4.4.3 Alternatives considered
We thought of implementing the search feature in a way that the required user for multiple inputs and displaying all the different results after each input. However, we decided against it as it would be too tedious for the user to input multiple times and the search process will be too long.
3.4.5 SelectSlotCommand
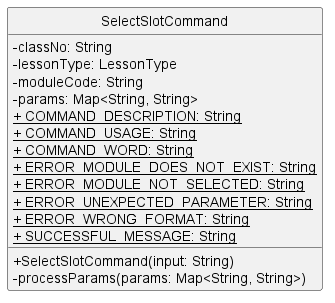
The SelectSlotCommand class extends from the Command class and selects the time slot for the
different lesson types.
3.4.5.1 How the feature is implemented
The SelectSlotCommand class locate the one of the modules that user has in the YAMOM timetable and changes the lesson slot
based on the information specified by the user.
3.4.5.2 Why it is implemented this way
We believe that the user must first register for a module before being able to change their intended lesson slot, which aligns with the user profile and typical user behaviour at National University of Singapore.
Also, we felt that the logic to check for slots validity will only occur under the context of selecting a new lesson slot and hence the logic is encapsulated within the class.
3.4.5.3 Alternatives considered
We considered allowing user to select any modules (even those that are not in the user current timetable) to be added with specific lesson slot.
However, this increases the coupling between different classes such as Parser and State, and does not align with the implementation of other commands.
Furthermore, it does not align with our understanding of user profile where students need to first register for a module, before they have the intention to select for a better lesson slot that fits their existing timetable.
3.4.6 SelectSemesterCommand
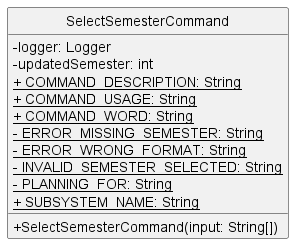
The SelectSemesterCommand class extends from the Command class and selects the semester that
the user wish to plan for.
3.4.6.1 How the feature is implemented
The SelectSemesterCommand checks the value representing semester that the user inputted and change the state of the application to plan for the intended semester.
SelectSemesterCommand would notify the user should the semester value inputted is not valid and prompt for the accepted values.
3.4.6.2 Why it is implemented this way
We thought that the logic to check for a valid semester would only occur under the context of selecting a different semester and hence the logic is implemented within the class.
3.4.6.3 Alternatives considered
We attempted having State to check for the validity of a semester.
However, we then felt that checking for the validity of a semester is beyond the intended purpose of the State class.
3.4.7 InfoCommand
The InfoCommand class extends from the Command class and gets all the details of the module
that the user wants.
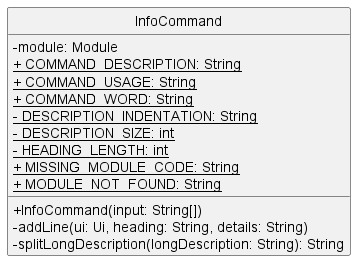
3.4.7.1 How the feature is implemented
The InfoCommand class extends the Command class.
It overrides the execute() method from the Command class.
The execute() method will get all the module details from the user input module code.
3.4.7.2 Why it is implemented this way
This function was implemented this way as it is the most intuitive way to get the module details. It also displays all the different lesson types and their respective time slots. However, if the user is planning in a semester that the module is not offered, the user will be notified that the module is not offered in the current semester and timings will not be shown. This is to prevent the user from selecting a time slot that is not offered in the current semester, which will reduce the chance of having an error if the user tries to select a time slot of the module that is not offered in the current semester.
3.4.7.3 Alternatives considered
We thought of displaying the full module details from the search results. However, we decided against it as it would be too tedious for the user to search for the exact module code first before getting the details. The user may not know the exact module code, which is not very user-friendly and takes up a lot of time just to get the module details for 1 module.
3.4.8 TimetableCommand
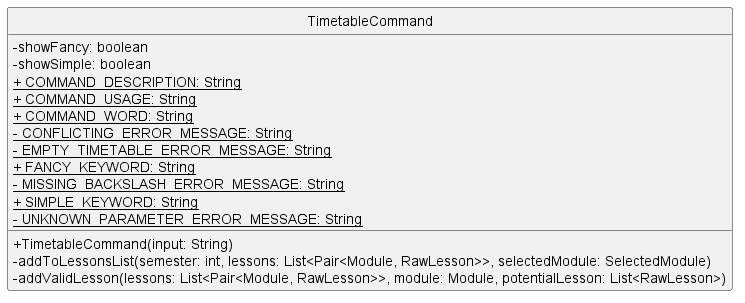
The TimetableCommand class extends from the Command class and displays the timetable of the
current state’s semester
selected modules.
3.4.8.1 How the feature is implemented
The execute method will create a List<Pair<Module,RawLesson>> from the selected modules of the current semester and
uses
the Timetable class to display to the user the timetable of the currently selected semester.
/show fancy is to show the timetable with color while /show simple shows without color.
3.4.8.2 Why it is implemented this way
To make use of the existing Timetable class that has a nice format. This prevents the need to create duplicate code to fulfil similar needs as the timetable is needed by other components.
3.4.9 ByeCommand
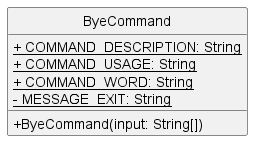
The ByeCommand class extends from the Command class and exits the program.
3.4.9.1 How the feature is implemented
The ByeCommand is the only Command subclass where it returns a true when the method isExit is invoked by the application class.
The ByeCommand only display some messages to inform user that the application is exiting and does not modify the state of the application.
3.4.9.2 Why it is implemented this way
We are able to check if the application is to terminate by checking against the isExit method regardless if it is the ByeCommand
It simplifies the higher level business logic for running the application.
3.4.9.3 Alternatives considered
We considered a mechanism to terminate the application within ByeCommand should user express intent to end the application.
However, this complicates the flow of the programme as it is hard to predict when the application would end.
Furthermore, we intended to implement more logic at the application level to ensure that the application would exit gracefully with all user information properly handled.
3.4.10 ListCommand
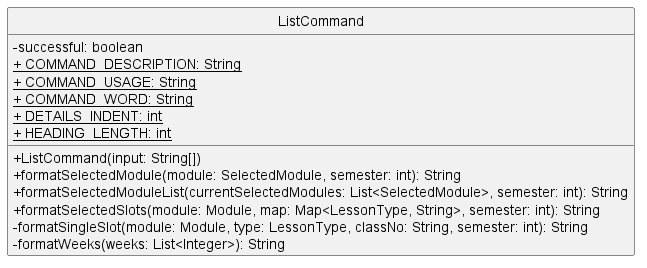
The ListCommand class extends from the Command class and lists out all the currently
selected modules and lesson slots.
3.4.10.1 How the feature is implemented
The ListCommand class takes the list of modules selected by the user at the current semester and parse each module to be formatted.
The format of the module will display relevant information about the module taken to the user.
3.4.10.2 Why it is implemented this way
We felt that the logic to format and list out information about selected modules will only be called under the context of a list command.
Hence, the logic for listing information of selected modules is encapsulated within the ListCommand class.
3.4.10.3 Alternatives considered
We considered having the logic to parse and format information under a separate class.
However, we felt that it is unnecessary to do so as the logic will be employed only under the context of a list command, and it increases the complexity of the project.
3.4.11 ExportCommand
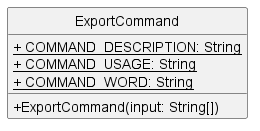
The ExportCommand class extends from the Command class and exports the current state
of the application, namely the selected modules and the respective selected lesson slots for all semesters and
outputs NUSMods links.
3.4.11.1 How the feature is implemented
The execute method will invoke method from the Link class to create multiple sharable NUSMOD links by semester.
The links will be created by the Link class and the mechanism to extract the modules from YAMOM timetable will be handled by the Link class.
3.4.11.2 Why it is implemented this way
This encapsulates the logic of creating the sharable NUSMOD links within the Link class.
The command class can focus on the higher level logic of calling classes to create NUSMOD link, and organizing the information to be
presented to the user through the Ui class.
3.4.11.3 Alternatives considered
We considered having the export class to create the NUSMOD link from the timetable
However, this would increase coupling of business logic and reduce the reusability of creating NUSMOD link.
3.4.12 ImportCommand
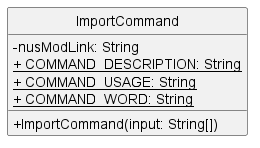
The ImportCommand class extends from the Command class and imports a single semester
from a NUSMods link.
3.4.12.1 How the feature is implemented
The execute method will invoke method from the Link class to parse a sharable NUSMOD link.
The link will be parsed by the Link class and the mechanism to add the modules to YAMOM timetable will be handled by the Link class.
3.4.12.2 Why it is implemented this way
This encapsulates the logic of parsing the sharable NUSMOD link within the Link class.
The command class can focus on the higher level logic of calling classes to parse link, and organizing the information to be
presented to the user through the Ui class.
3.4.12.3 Alternatives considered
We considered having the import class to parse and add modules to the YAMOM timetable itself.
However, this would increase coupling of business logic and reduce the reusability of parsing logic.
3.5 Utils Component
3.5.1 UI Component
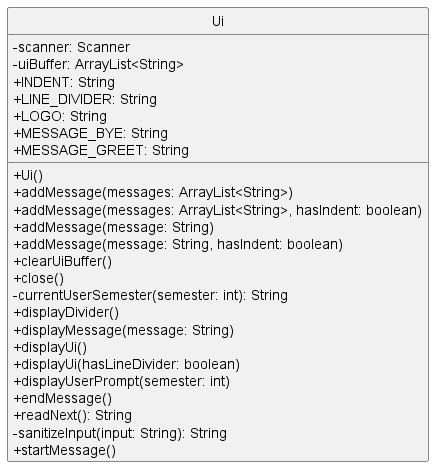
The UI component can:
- read input from the user
- store and print out messages to the user
3.5.1.1 Why it is implemented this way
To comply with the Model-View Controller Framework To separate the internal representations and processing of information from the presentation and acceptance of information from the user
3.5.1.2 Alternative Considered
Each component to handle the presentation of information to the user
- Increase coupling between components
- Hard to define the sequence that information being presented to user
3.5.2 Link Component
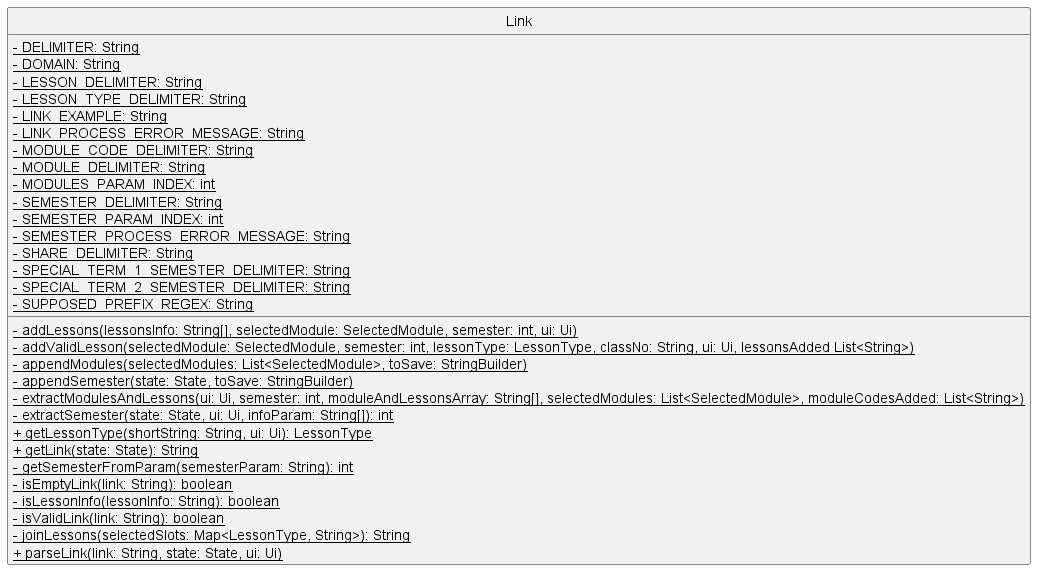
The Link component can:
- create a NUSMod link to be used in a browser
- Parse a NUSMod link to import modules into YAMOM
NUSMods export links are of the form:
https://nusmods.com/timetable/sem-SEMESTER_NUMBER/share?MODULE_INFO&MODULE_INFO
The two useful segments are the SEMESTER_NUMBER and the MODULE_INFO.
3.5.2.1 Why is it implemented this way
To separate out the handling of NUSMod compatibility.
3.5.2.2 Alternative Considered
To implement the handling of export in Storage class and import in Command class
- Increase coupling between components
- Decrease reusability of NUSMod link processing
3.5.3 Storage Component
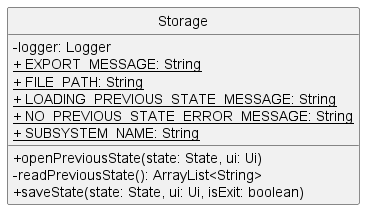
The Storage component can:
- read from the hard disk NUSMods export links
- save to the hard disk
Different checks have been implemented to ensure that even if the data file is modified in any way, it would not crash the programme. The parts that are valid will be parsed while the rest are ignored. The data file is set to be hidden and read-only to discourage users from modifying the file although this can not prevent them from changing the file. Data for the saved state will be overwritten each run of the application to prevent persistent data corruption and not require the user to manually edit the data file.
3.5.3.1 How the feature is implemented
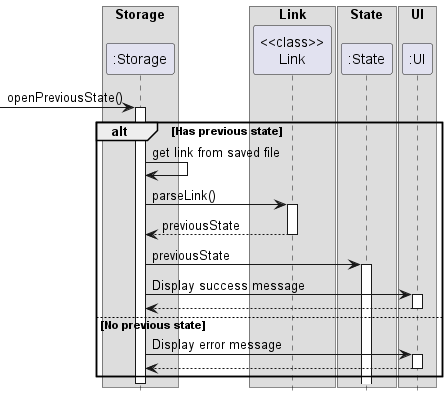
When the application starts up, the storage openPreviousState function will be called
to load previous state. The state is also saved after every command to prevent data loss if the programme suddenly
crashes.
3.5.3.2 Why it is implemented this way
To facilitate easy transfer of information from NUSMods to YAMOM. NUSMods is currently the most popular website used by NUS students to keep track of their timetable. This encourages users to swap to using YAMOM.
3.5.3.3 Alternatives considered
Storing as .json file
- would have to implement another function for export/import function
Using the java preference API, java.util.prefs.Preferences to save user preferences
- will not pass the GitHub automated checkers since it access and stores data in the registry.
4. Documentation
The following section describes how documentation for the project should be written. Note: documentation is all written in GitHub-Flavoured Markdown.
5. Testing
The following section describes the testing methodologies followed in this project to ensure high-quality, bug-free code as far as possible.
The more critical classes each has a test class which tests the various functions implemented in those respective classes.
5.1. Running tests
5.1.1. Input/Output re-direction.
To run the IO re-direction tests, type ./text-ui-test/runtest.sh (Linux/Mac) or ./text-ui-test/runtest.bat (Windows) in your terminal.
This method is used to simulate user input and to test the output of the program. This method was introduced in our individual project and was used to test out the Duke main class. Similarly, this method is used in YAMOM. As simple as it may seem, this method is very useful in testing the program as it allows us to test the program without having to waste time typing in the commands manually. A simple file comparison is done to check if the output is as expected.
5.1.2. Unit testing
JUnit tests can be run using ./gradlew test.
Unit testing is done to test the individual functions of the classes. This is done to ensure that the functions are properly working in isolation. This is done by using the assertEquals/ assertTrue/ assertThrows method to check if the works as expected. A sample of the unit testing is shown below.
The filterModuleSearch method is tested to ensure that the correct number of modules are returned when the user searches for a module with different keywords. The assertEquals method is used to check if the number of modules returned is as expected.
  @Test
  void filterModuleSearch_fullValidInputFields_expectCorrectNumberOfFilteredModule() {
      String toSearchModuleCode = "dtk1234";
      String toSearchModuleTitle = "Design Thinking";
      Integer toSearchLevel = 1;
      Integer toSearchSemester = 1;

      List<Module> searchResult = SearchModuleCommand.filterModuleSearch(toSearchModuleCode, toSearchLevel,
              toSearchSemester, toSearchModuleTitle);
      int numberOfFilteredModulesInSearchResult = searchResult.size();
      int expectedNumberOfFilteredModules = 2;
      assertEquals(expectedNumberOfFilteredModules, numberOfFilteredModulesInSearchResult);
  }
5.1.3. Regression testing
Regression testing is done to ensure that the program is still working as expected after a change has been made. This
is being done by running ./gradlew test and checking if the tests are still passing. This is done to ensure that the
newly added features do not break the previously existing features.
5.1.4. Developer testing
Developer testing is done by the developer themselves to ensure that the program is working as expected. This is particularly done when the developer is implementing a new feature. This is done by running the program and testing the various commands to ensure that the program is working as expected before committing the changes and subsequently making a pull request.
5.1.5. Integration testing
Integration testing checks whether different parts of the software work together as expected. Integration tests aim to discover bugs in the ‘glue code’ related to how components interact with each other. As more features are added, we encourage developers to continually write and maintain integration tests for continuous integration checks. Often times bugs are often the result of misunderstanding what the parts are supposed to do vs what the parts are actually doing.
The methodology of hybrid unit + integration testing is followed such that we minimize our need for stubs and at the time develop our plentiful base of unit tests. An example of hybrid unit + integration testing is as follows:
In this test we aim to check if the ‘glue code’ execute() method from the AddModuleCommand class integrates with
in particular State and SelectedModule class instances. We are testing
if the selected Module in this case CS1010 object, by asserting it does not exist in the state object before
invocation of execute() and exists within the State instance after.
    @Test
    void testExecute_validModuleAdded_StateUpdatedWithNewModule() throws YamomException {
        Module module = Module.get("CS1010S");
        assertNotNull(module);
        State state = new State();
        Ui ui = new Ui();
        Storage storage = new Storage();
        int semester = 1;
        state.setSemester(semester);
        SelectedModule selectedModule = new SelectedModule(module, semester);
        assertFalse(state.getSelectedModulesList().contains(selectedModule));

        String[] testInput = {"add", "cs1010s"};
        AddModuleCommand addModuleCommand = new AddModuleCommand(testInput);
        addModuleCommand.execute(state, ui, storage);
        assertTrue(state.getSelectedModulesList().contains(selectedModule));
    }
Overall, the aim is to ensure as much branch coverage as we can, thus we encourage diverse ranges of hybrid testing.
5.1.6. System testing
System test cases are based on the specified external behavior of the system. Sometimes, system tests go beyond the bounds defined in the specification. This is useful when testing that the system fails ‘gracefully’ when pushed beyond its limits.
As of now, YAMOM being a lightweight personal CLI application we do not foresee the need for system testing as on most modern personal computing system, more than adequate speed is provided. In the future, if the project evolves to be deployed on to a server, and the architecture of the application changes to become an API for users to interact with, we will be using system testing.
5.2 Instructions for manual testing
Typically, for manual testing, the good flow of testing would be to follow the principles that we try to implement in
the text-ui-test/input.txt file. Here is a small excerpt:
help
search /code 2113 /title software
add cs2113
list
add
select /module cs2113 /type tut /code 4
list
export
import https://nusmods.com/timetable/sem-1/share?CG1111A=LAB:01&CS1010=LAB:C03,TUT:10,SEC:1
export
list
When manual testing, the developer should attempt to invoke commands then visually confirm the expected behaviour from a
user standpoint. From there, the developer should iterate and attempt to check edge cases, push program boundaries etc.,
in order to . Running through the excerpt above, after invoking help to look at available commands and input formats,
the developer attempts to use the add command then visually confirm that his intended module has been added to the
timetable with the list command. From here a suggestion for manual testing could be to attempt to input invalid
commands
such as add cs2 then confirming with the list command to ensure that unexpected behaviours from user is accounted
for
and handled.
Manual product testing also has the benefit of being able to replicate user experience before alpha releases, thus it is
important to do so in regular intervals, and continually add to text-ui-test as it is the closest replica of automated
user experience testing.
Target user profile
The target user that we have in mind is a student who is currently in NUS and is using NUSMods to plan their timetable. However, we want to make it easier for users that are comfortable using CLI. This would be a more efficient way and also less time-consuming for the user to plan their timetable. Most importantly, it is lightweight and does not require any internet connection to use.
Value proposition
Yet Another Module Organizer and Manager (YAMOM) is an all-in-one desktop app featuring a full course catalogue, module search and timetable builder for the National University of Singapore, optimized for use via a Command Line Interface (CLI). If you can type fast, YAMOM can get your timetable done faster than traditional GUI apps.
Appendix A: Product scope
YAMOM is meant to be for personal use. As of now we aim to support single users running the application locally on their personal devices.
Appendix B: User Stories
| Version | As a … | I want to … | So that I can … |
|---|---|---|---|
| v1.0 | student | search for modules by module code, name or faculty | quickly add them to my planner |
| v1.0 | new user | view my timetable | visualise my school schedule |
| v1.0 | new user | add and remove modules to my planner | customise and organise my modules this semester |
| v1.0 | new user | view a short description of each module | plan what modules to take |
| v1.0 | student | select timetable slots | plan my schedule |
| v2.0 | student | select semester | plan my schedule in different semesters |
| v2.0 | student | read details about a particular module | know more about a module |
| v2.0 | student | export my timetable | share my timetable with my friend |
| v2.0 | student | import timetable | plan my timetable that is still in progress |
| v2.0 | user | get help | know how to use the application |
Appendix C: Non-Functional Requirements
- YAMOM should display a colorful timetable to enhance readability.
- YAMOM should be able to have enough storage to store all my modules and timetables.
- YAMOM should be able to save my data persistently.
- YAMOM should be cross-platform and portable without performance or feature degradation.
- YAMOM needs to be a lightweight and fast application.
- YAMOM should have a neat and friendly interface so that stressed out students will feel more relaxed after planning out their schedule.
Appendix D: Glossary
- NUSMods - NUSMods is the most widely used module manager / organiser tool among NUS students.
Appendix E: Acknowledgements
Special thanks to the author of the following sources for inspiration and ideas that contributed to the development of YAMOM
https://stackoverflow.com/questions/25853393https://www.lihaoyi.com/post/BuildyourownCommandLinewithANSIescapecodes.htmlhttps://github.com/nusmodifications/nusmods/blob/master/scrapers/nus-v2/src/types/modules.ts